Sunday 28 January 2018

What's behind door number 1?

I completed the lower half of the drivers side door, with an extra hoop to give me extra elbow room:


Next step was to trial the covering with some left-over vinyl I used on the tunnel top panels:


You can see why I definitely won't be sewing this up myself with the real stuff :-)

Obviously looks pretty crud at the moment but the idea is to try it out on the car and see if it feels viable - at least it does fold:


Friday 26 January 2018

Framed

While I wait for the P38 filler to dry, I continued with the doors.

My plan for doors is a light plastic strip frame, eventually covered with marine vinyl (the same stuff the roof is made from), with clear plastic as the 'glass'. To help with storage when off the car, the doors will have 2 un-connected, sub-frames; just the vinyl will keep them together so they can fold lengthways (if that makes any sense). So, this is the top frame:


The hinges will screw on to that edge on the right-hand side. The plastic strips are very flexible (maybe too flexible?) and light and they're connected with the Hammond© hinge arrangement:


Two metal tabs either side of the join, riveted together.

Now, I have no idea if this will work - the plastic strips I bought are more flexible than I expected and may flap about too much when on the car. This is made worse by the fact I want these doors to go all the way back to the rollbar, which is why that frame may look so long. I'm planning to put magnets on as much of the frame as possible, to help prevent 'flapping'. So far, I've spent about £50 on the bits, so if it doesn't work out, it's not a disaster. The problem is that GBS want £350+ for doors - grates on me to pay that much but my few trips in the rain have convinced me I need them. We shall see...

Wednesday 24 January 2018

Fill 'er up

With P40 filler, I filled in the damage on the arch:


I've got P38 filler to go on top and I may have just been able to use that alone but no problem.

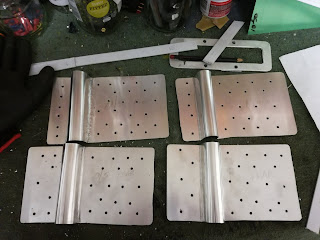
Bought some ally sheet, cut it into 4 and formed it round the wheelarch supports so they are the same basic shape as the mesh I used last time but hopefully, will be much stronger :


Thursday 18 January 2018

Garotted

So, on with the repairs... first, take off the N/S front wing. It's attached in the same way as the O/S so it may also make an escape attempt in the near future.

After 2 hours, I was debating the wisdom of this plan - I think I used every item in my garage to try get the damn thing off; screwdrivers, chisels, Dremel and selection of bits etc. Eventually, the best tool was some wire made into a garotte to slice through the gunk between arch and support. This got me some of the way through and then a previously-useless saw with a very flexible blade did most of the rest:


On my last trip, I was getting brake judder when braking hard at speed. Forum discussions suggested the problem may be a lack of grease on the caliper slider pins so while I had the wheel off on this side, I stripped the caliper and re-greased the pins. They didn't seem too dry originally but felt a bit smoother afterwards, so maybe it will help - time will tell. I'll do the other side as well when I take that wheel off.

I'm going to re-attach the arches by making full width ally brackets with large wings and lots of gunk - hopefully, this will make a larger contact patch than just the support was before and will be physically stronger than the mesh I used.

I'm going to repair the damage to the wing with P40 filler (never done this before!) and then, I have a cunning plan to wrap both wings in some vinyl pattern to be determined. This saves trying to find the same shade of blue as the rest of the car and will give Zedster a more unique look, assuming I don't make a dogs dinner of the wrap :-)

Sunday 14 January 2018

Striptease

I had an early start to meet up with a group from the SKCC forum and had a great 80 mile run on some lovely roads. With a couple of V8 powered kits, these runs always push my performance envelope and they can be... er... interesting.

None more so than when, 5 miles before the end of the route and on a particularly fast straight, my front wheel arch decided it was all too much and ejected:


Fortunately, it didn't hit either of the 2 guys behind me and I was able to stop and get the wing out of a ditch. It's got a major grazed section (hopefully repairable) and I'll also need a new indictator as that got ripped off.

When I put these on, I thought I was being over-zealous with the amount of gunk and adding the mesh - seems I wasn't cautious enough. I'm going to have to ask around to see if there is a better attachment method.

Monday 8 January 2018

Southern exposure

As mentioned, I went on a trip out yesterday to Old Sarum airfield in Wiltshire and it was all very interesting.

The airfield is one of the oldest in the country, having opened in 1917 and it contains the Boscombe Down Aviation Collection which uniquely allows you to sit in various jet fighters of the last 50 years or so. A bit more interesting than the normal museum fare...

My hood performed well at all speeds up to 85mph except for the side straps. On one side, the rivet holding the popper in snapped which is my fault (I just need to re-do it more carefully) but a little more of a concern is that the special poppers that SoftBits provided don't seem to 'pop' together very well. As a result, the strap on the other side kept un-popping. I may need to call them and see if I've done it wrong somehow...

I left at 8am with an air temperature of about 3degC, which wasn't too bad. I was actually colder when I stopped at the airfield and got out of the car - the wind chill must have made it -10 degC at least!

But worth it for the picture:


...and the drive there was particularly fun with so little traffic, although less so on the way home as the Sunday drivers came out.

Saturday 6 January 2018

Hats off

Finally, I have a roof and it is amazing:


Now, I have cocked it up a bit, despite all my careful measurements, and the hood is slightly askew, hence the ripple in the pic above (I think I can sort that out using the adjustment straps on the side) BUT it makes such a difference!

I had always assumed that most of the windblast came round the windscreen rather than from above but, obviously, my knowledge of aerodynamics is worse than I thought. The roof cuts out about 80% of the windblast and makes a drive, especially in the cold like today, so much more comfortable. A true revelation and easily worth the £250 investment. Yes, getting in  and out is a little tricky but not as bad as expected and visibility is unaffected.

I have an early trip out tomorrow to meet up with some people from the RHOCAR forum near Salisbury, a good 2 hours each way - looking forward to it.