Showing posts with label Repair. Show all posts

Friday, 1 September 2023

Bones, balls and sweat

 Pretty quick fix for me, although it was hard work...

So looking at the parts before I removed them, they looked corroded but not too bad:


It took me a few days to get hold of GBS because of the bank holiday but the new wishbone and ball joint arrived next day and then the state of the old ones is more obvious:

Consensus is that the lock nut somehow got loose and the ball joint rod has been vibrating in the wishbone for gawd knows how long; long enough to wear it effectively smooth and so it popped out on a small country lane.

Getting the old ball joint out was much easier than I expected, as was getting the wishbone off - access to the bolts is pretty easy.

However, after that, it went a bit pear-shaped...I thought I'd better check the ball joint screwed into the wishbone - should be simple, yeah? Oh no....

After clearing powder coat at the end, the ball joint initially wouldn't screw in at all. By sheer luck, I had the right size tap for the wishbone thread (M18x1.5) and I ran that down the wishbone. There was some resistance but not much and after that, the ball joint started going in, although not very smoothly. I got about 2/3 of the way down and it stopped. This wasn't far enough down for what I needed so I started putting a bit more effort in (holding the ball joint in my vice and using the wishbone as leverage to turn it). This was, I soon found out, a BAD idea. I tried unscrewing the ball joint but no joy - it was stuck fast!

At this point, I gave GBS a call, to check I wasn't doing anything wrong. I got through to Matt and the first thing he said was, "yeah, we get that sometimes. The thread in the wishbone isn't long enough - we have to chop 5-10mm off the ball joint rod". Well,  thanks a fecking lot...now you tell me.

So I had obviously reached the end of the thread and tried to go further, jamming it in good and proper. I went back in, using a hairdryer and lots of WD40 to try unwind it. After about an hour of sweating and swearing, it finally came off but it was butchered:


I was planning on sending it all back to GBS and insisting on a free replacement as it was their fault IMO but I have a Wales trip in less than 2 weeks and a show on Sunday that I was looking forward to, so on the advice of the SKCC Massif, I had a go at fixing it.

That damaged thread on the ball joint rod was, coincidentally, about 10mm from the end, the amount GBS said I should hack off anyway. The wishbone thread looked like it had some damage in it but the tap went down it OK, so I hacked off the 10mm, deburred it, copper grease to prevent future corrosion and it just went in far enough to match the other side of the car.

After that, it was fairly simple; bushes in (repeating one of the first ever jobs I'd done on Zedster 7 years ago!), wishbone back in, ball joint in the hub, all tightened up and job done:


You might be able to see how badly mangled that lock nut is from being held in my vice while I tried to get the ball joint out.

I've left that IVA cover off and used paint to mark it so I can easily check in future if that locknut gets loose.

The other side seemed pretty solid, so I've left it alone, except for removing the IVA cover and painting the locknut.

Test run tomorrow and hopefully it will all be OK.


Thursday, 24 August 2023

The Recovery Truck of Shame

 Yes, for the first time in Zedster's life, he came back on a flatbed...

I was driving back from a work lunch down some small, country lanes when suddenly, the steering went very loose and didn't seem to be doing anything. My first thought was the steering rack had dropped off or something but i noticed the front n/s wheel wasn't...er...upright:


A closer look and it looked like the top ball joint had somehow dropped out of the wishbone:


Scarily, I was stopped on a blind bend, so I had to concentrate on directing traffic around my car. I called the police and they eventually arrived about 45 minutes later but I still had to help out as only one policeman turned up - 3 hours of arm waving was hard work!

The recovery truck finally arrived and brought us home. On the truck, I was able to straighten the wheel and push the ball joint back into the wishbone (it is supposed to screw in! Where has the thread gone?!) and drive Zedster off the truck into my garage.

So looks like I'll need new wishbones (I'm going to do the other side as it might be in a near-failure state as well) and I'll look to fit some sort of pin through the wishbone to prevent this happening again.

Sunday, 4 September 2022

Back in gear

 So time to repair the quickshift. I ordered some steel tube to go inside the existing tube, brought out the Dremel and drilled some holes to prepare the shift for welding:


Took it to Matt who took about 30 minutes to produce this:


More Dremel grinding tidied it up, then primer and paint to make it more presentable (not that it matters as its out of sight) :

After many discussions, I decide to try and rubber mount the whole thing, to prevent cracking again in future. I've thus fitted rubber washers like this:


Look good but Holy Sweatballs, they were an utter pig to fit. First, I had to cut down 2 sets of washers because there was not enough space for them to fit against the MT75 gearbox. Then, it took skills that Cirque de Soleil would have been proud of to get the damn things in - trying to get my chunky arms in the small gap between tunnel panels so that I could hold the rear washer in place while pushing the bolt through - it took me about 2 hours of sweating, swearing and having my arms cut to ribbons by the cable ties holding the brake lines. 

Annoyingly, it really all needs to come out again. I knew that adding the washers would move the gear lever back, so I tried to adjust it by the width of the washers but, unsurprisingly, it didn't work and the lever wouldn't slot into my gate, as before. I was just too exhausted to take it all out again just to realign it, so I'm back to my gearshift gaiter for now. 

I've not even had chance to go out and check it works - I've had a horrible flu for the last few days and I've booked an MOT for tomorrow - hopefully, I'll feel up to it. 


Thursday, 11 August 2022

Who needs gears, anyway?

I planned a weekend trip to Cornwall to see family - I get in the car and I can't seem to select reverse? Then I prod the gear lever and it bounces up and down - that doesn't look good.

Panels off and, yes, the damn GBS quickshift has snapped AGAIN!!


UNBELIEVABLE!!

I guess I'm lucky I was at home in my garage, unlike the last time this happened.

I've had some discussions with Tony on how best to fix it (he fortunately happens to be an aircraft engineer) and Matt from the SKCC club has agreed to do the welding for me.

On holiday next week, so I'll get on it then...

Sunday, 24 July 2022

Pride before a fall and rise

 So I decided to try sort out my temperature gauge - it hasn't been working for months.

I'd checked the wiring and sensor and I knew both were OK so I decided to try dredge up some knowledge from my electrical engineering degree 30 years ago (I went into software and forgot most of my electrical stuff). 

Working on the fact that the sensor is just a load in the circuit that includes the gauge, I decided I needed to lower its resistance to allow some voltage to move the gauge needle. I recalled that placing another resistance in parallel with the sensor should achieve that. Not knowing what resistance I needed, I bought a £3 variable resistor, wired it in parallel with the sensor and stuck the resistor on a convenient surface:


Now, before fitting it properly, I jury-rigged the wires to make sure the theory worked and, Holy Shit but it did - with the ignition on, I altered the resistance and the gauge needle moved accordingly! I was seriously impressed with myself and I almost fired off an email to my university to congratulate them on their teaching abilities. 

Anyway, I then wired the resistor up properly, which involved snipping off the old spade terminals on the earth and sensor. While doing the earth, I noticed some dirt under the terminal, which i unthinkingly removed and crimped on a new terminal. 

Once wired up, I connected up the laptop so I could read the coolant temp and adjust the rheostat so the gauge matched it. Once started and running for a minute, I could already see the needle rising on the gauge. 

Hugely proud of myself, I went off for a drive to check it worked at all temperatures. A mile down the road, however and the gauge read 110 while the laptop showed 95 so I stopped to adjust the rheostat. But I found that no amount of twiddling would get the needle below 80 - I should have been able to set it to anything I wanted, in theory?! 

And then it dawned on me - the sensor was working correctly, without the need for the rheostat. To prove it, I cut the wires and voila! A working temperature gauge! 

So all I had needed to do months ago was remove the earth and clean it (and maybe the new, shiny spade terminal also helped). 

Doh! 

So a lesson learned - the simple things first before dusting off the old grey matter. 

Saturday, 18 June 2022

Screening process

 Time to fix my windscreen; did I mention that the screw holding the main frame to the bottom cross bar has failed on the passenger side (I'd already fixed the same issue on the drivers side a while back)?

Not a huge problem and fix; a strip of ally in a boomerang shape, slit in the rubber, bend the strip round, drill a few holes and whack in some self-tappers - job done:

Pretty damn horrible, even worse than the drivers side but does the job.

To make up for the ugliness, I fitted the excellent 3D-printed grill badge Tony made for me:

Now that is more like it!

Also, the new cap on my header tank seems to have fixed the coolant overflow problem, which is a result. I really need to get my temp gauge working....


Wednesday, 11 May 2022

Let's get Radical

So when changing my broken fan, I noticed a leak from the radiator - time for a new one. I ordered it from Coolex for £140, only slightly more than the crap original I got from GBS:

Zedster looks a bit naked like this... 

So, initially this all seemed too easy - the rad fitted straight onto the existing bracket with only extra long bolts needed:


But when I tried to refit the nose, it wouldn't. The new rad is only a little thicker than the old one but the flanges are on the engine side, unlike the old one, so it now sits a good 2 inches further forward.

Not sure if I've done this right but I used some brute force to bend the chassis brackets out a bit, pushed the rad behind it, drilled extra holes in those brackets and we're back in business:


While the nose was off, I updated the front grille to put a nice mesh instead of the fence-like original:


Almost looks like there is nothing there... 

I still need to go for a run and check I don't have airlocks but looking OK so far and ready for my week-long trip to Central England (need to check the routes, not even sure where we're going) in 2 weeks time - woohooo! 

Thursday, 10 February 2022

Snap to it

 With another sunny but cold day beckoning, I popped out for a short run with my son in his car. All going well until - PING - there goes my throttle cable again!

Luckily, I was able to roll to a convenient layby where my son then watched some quality Heath Robinson jiggery-pokery to lash up a new cable using a bicycle brake cable I keep for just this sort of emergency. I managed to limp home and I've ordered a new cable from GBS.

I have also decided to buy their short throw throttle conversion kit - basically, a new pedal with the fulcrum a few inches lower than the standard pedal. This means a shorter movement of the pedal for the same effect, which actually doesn't sound great to me because I imagine at slow speeds, that might be quite jerky?

However, the advantage of this kit is that it includes a solid steel bracket with built-in throttle stops in both directions. So the pedal should be firmer (mine has always been a bit wobbly) but, more importantly, I won't be stressing the cable as much when I go for full throttle, which is probably what has contributed to it's short life.

In a way, I'm quite glad this has happened - I've always worried about the strength of my throttle setup; this has given me an excuse to improve it. There is a YT video from GBS showing how to install this kit and I noticed that they have also strengthened the pedal box using an extra plate, which makes a lot of sense. With my existing setup, you can see the walls of the pedal box bending every time the throttle is moved, so I'll be adding that same plate.

Before the cable went, my son caught me on his dashcam attempting some feeble power slide - it felt much more impressive from my point-of-view (and you may well agree with my son's comment on the video):


Monday, 21 September 2020

Here Be Dragons

 The SKCC Rogue Runners Wales 2020 trip started at stupid-O'clock (4.30 am) at Newlands Corner - and ended in horrible failure for me, a day early - but more of that later.

Day 1 - Surrey to Llangollen

Once again, we met in the pitch-black of Newlands corner and set off at 5am - the 2 Elises of Graham and Roger (1 more was late and Steve would catch us up later), the Quantum Extreme of Rob, Duncan's Caterham, Tony's Quantum and me. Our target was breakfast at Newport, to meet the final member of the group, Linda and her Tiger.

This year, the route was less M4 and more A roads, which was much better but slower and we got to breakfast around 8.30am. The weather was glorious and would remain so for the rest of the trip - incredibly lucky.

I took very few photos and the only video I thought I had taken didn't, so apologies for that (but you may be sick and tired of my videos by now).

After the breakfast farce of us sitting 1 table apart and waving across the room at each other (then standing inches apart in the same space for coffee and toast), we set off north, towards the evening hotel at Llangollen. We were prepared to alter our route if we were somehow forced to avoid the 2 Wales counties supposedly locked down (I was excitingly looking forward to driving through a police roadblock like a scene from Smokey and the Bandit) but there didn't seem to be anything on our route, although we were avoiding the large A-roads.

The route was an improvement on last year, with quieter roads although traffic was a bit heavier as well. I must remember to buy food at one of the petrol stops next time - I was expecting a nice cafe stop for lunch but everyone seemed happy to skip it!

The drive was wonderful - sun shining, lovely roads, great views - it all flew by too quickly (literally). We even, at one of our stops in a layby, saved a sheep that had got stuck in a wire fence! Annoyingly, my hot-starting issues continued, so every fuel stop was a battery-sapping cranking before Zedster fired up.

Sat-nav issues were, as always on these trips, numerous. I was the only person not to have a TomTom, so mine kept choosing a slightly different route to everyone else. Normally, I stayed in the middle of the pack and just followed others but this didn't always work and at some point I lost everyone and so spent the last hour or so on my own. I cannot remember how I lost them but it wasn't the end of the world - gave me a chance to just concentrate on driving and my route was brilliant - Zedster was flying. Even the last few miles into Llangollen wasn't as bad as last year and I was second to arrive at the hotel (after Tony, who had also got lost at some point). We need to recruit navigators!

The Hand hotel in Llangollen was right in the centre of town and it had virtually the only car parking space in the centre. The hotel did not reserve guests spaces, so getting us all parked was tricky but we finally managed to squeeze us all in. I went for a wander to buy some tourist tat for my family:


A few beers and then a nice meal in the hotel restaurant capped a superb day.

Day 2 - circular North Wales route

After a hearty full English, we set off on a new route devised by Duncan and it was a corker - starting up the famous Horseshoe Pass to some lake (sorry, I'm never good with names), it was an amazing sweeping road, although it is a notorious biker racetrack, so now has average speed cameras along it. However, averaging 60mph is pretty difficult on those roads, so it didn't bother me (although I await a brown envelope in the post in the coming weeks!). At the lake, my sat-nav seemed to miss the coffee stop at the lake (very annoyed about that!), I think because I was just enjoying the road too much and not looking at the screen. Tony and Rob did the same thing and so the 3 of us decided to just carry on and meet up with the others later:

Shortly after the above pic was taken, on a single-lane road with no passing places, a huge tractor appeared around the bend. We had to reverse 200m or so before he managed to squeeze on a kerb and let us past. We took turns to lead and managed to keep together as far as Llandudno, where we stopped for a coffee and a chip butty for me (why does no-one else eat lunch?!). With amazing timing, we set off for the toll road round the Great Orme just as the others pulled up behind us.

The rest of the day was a blur - Conwy Castle, Llanberis Pass (I'm told), great roads, lovely scenery, all bathed in sunshine. Predictably, I missed a turning, with Rob following me while the others went off. I should have just turned around but I HATE turning round and Rob and I spent the last hour alone, occasionally hearing the others over the radio. Later on, I lost Rob as well - I'm like a reverse people-magnet! Annoyingly, I missed the stop at the Ffestiniog (sp?) railway but the drive was just awesome and I pulled up back at the Hand, the first back, with Rob arriving soon after.

That evening, after a couple of beers, half of us de-camped to a local Indian for an enjoyable meal.

Day 3 - Llangollen to Llandrindod Wells

Today went very pear-shaped for me. It started ok, with the group splitting up and half (the ones who got ready sooner) leaving first - I left in the second group. We had a great hour or so, on a lovely road towards Bala.

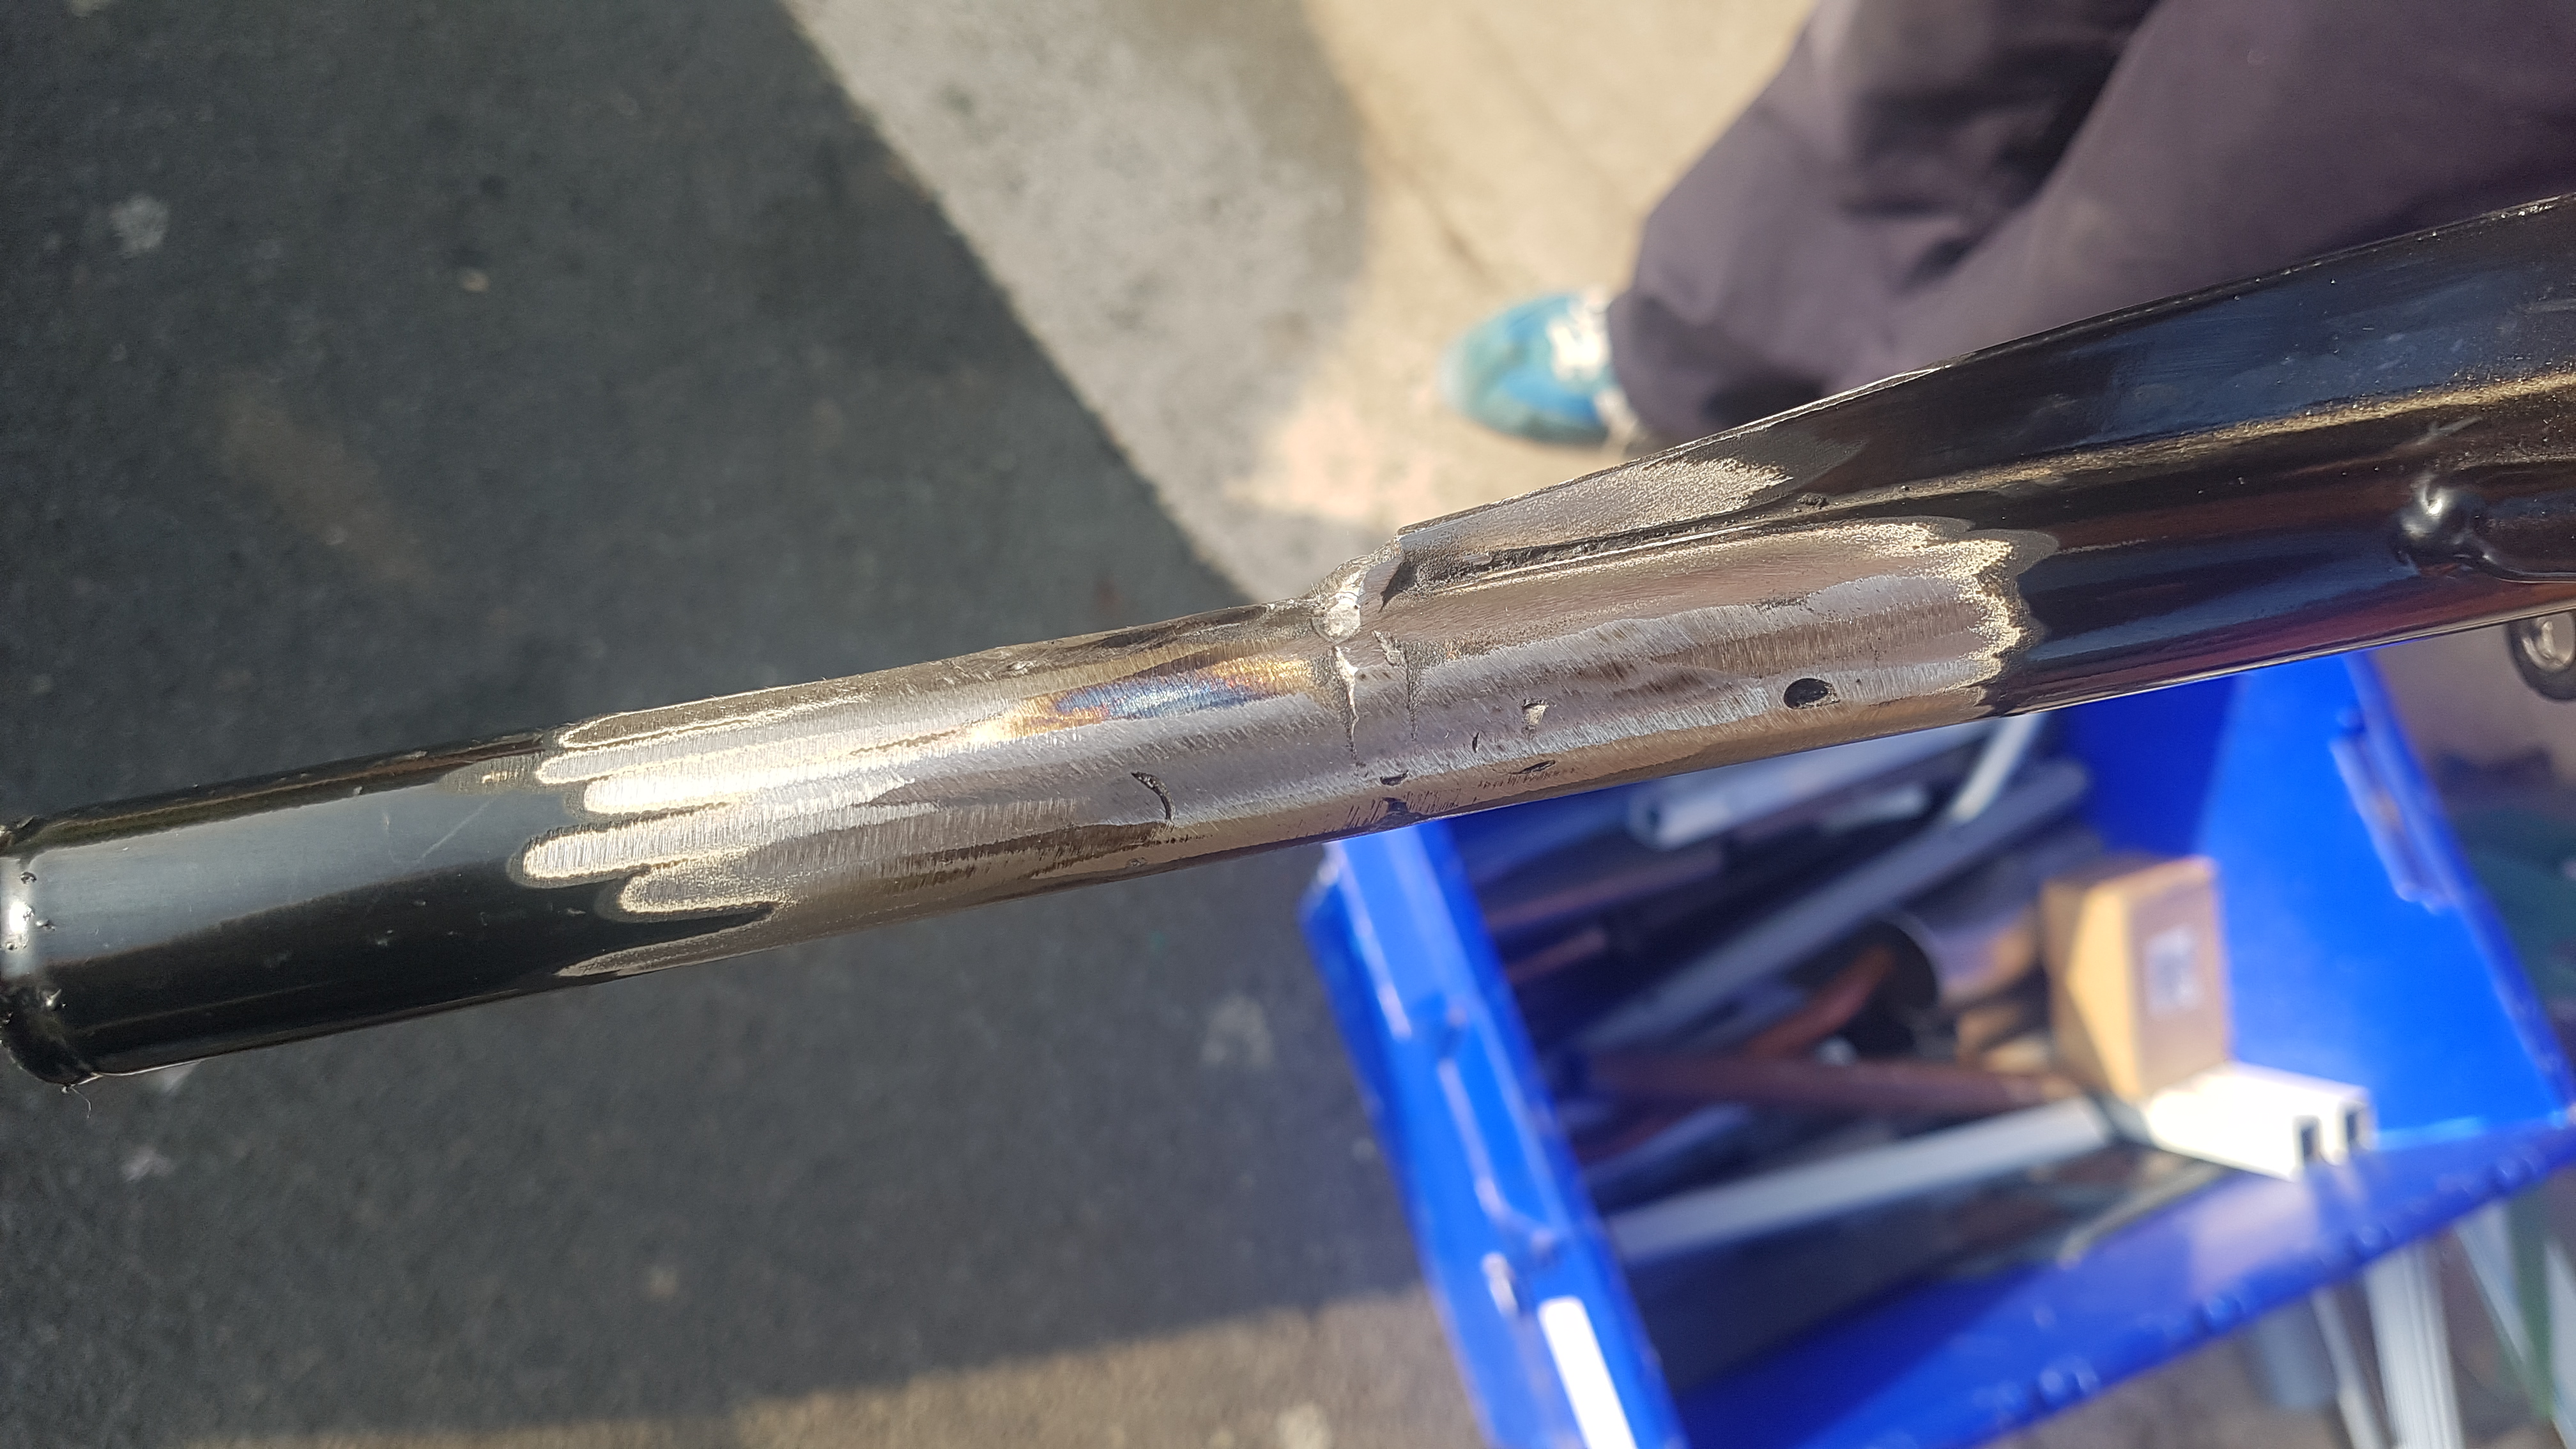
Around this time, I heard an ominous clunk from my gearshift. I mentioned it on the radio and we agreed to have a look at it at the next stop. Ten minutes later, just after a hairpin bend, my gear lever went loose and there was a clank noise as something dropped in the tunnel. I rolled to a halt in a layby and took the tunnel top of, expecting to see a bolt having vibrated loose. Sadly, it was MUCH worse than that:


That is the top pole of the GBS quickshift which had completely snapped. Game over. Without welding equipment, none of us could think of a fix, so I called my breakdown company and the others left to carry on. 

Now, I'll have to admit, the ensuing chaos was mostly my own fault and I'll write it here to remind myself - feel free to skip this long paragraph. It starts with the fact that my first MOT was due on August 1st. I thought I was entitled to the 3 month MOT extension because of Covid but, no, that ran out on July 31st!!! So my MOT was due August 1st, which I discovered a week before and I couldn't get a test done before that date, so it eventually got done on August 8th or so. Unfortunately, this meant my direct debit for my road tax failed on August 1st because the DVLA system said my car had no MOT, so I had no road tax. Now, my breakdown cover is through ADAC, the German version of the AA. They have an arrangement with the AA but when they called the AA, they said they weren't allowed to come try fix the car because it was, strictly, not legally allowed on the road. All they would do was tow it to a 'storage area' until I paid the road tax. I then discovered that my ADAC cover would only allow £300 towards recovery home - AA wanted £800 to do that! So even if I got the AA to come out, all they would do was take it to a garage (this was Sunday, none would be open) and I'd have to hang around while someone tried to fix my car, for some exorbitant rate. I just wanted to get the car home where I could do the fix myself. I used an online emergency tow service and got some bloke who would recover me for £400 but he would take 3-4 hours to get to me (he was in Manchester). ADAC agreed to pay £300 of that, so I asked the guy to come get me and settled down to wait.

By this time, it was 2pm and I'd already been sat by the side of the road for 3 hours. Bored, I started rummaging through my tool kit to see if there was anything I could do as a bodge to get me moving. Thinking it was like a broken leg, I looked for a splint and bandages - Allen keys and gaffer tape, maybe? After a few tries, I had this:

And, amazingly, it seemed to work, although I had to use 2 hands to change gear - one to push the rose joint in and stop the bodge from pulling off, the other to move the lever. Just then, a guy from the RHOCAR forum returned my message and invited me to stay at his place overnight and he could fix the part on the next day. Only problem, he was 70 miles away in Tamworth. I cancelled the recovery guy and went for it...

I set off and I managed the first 15 miles in 4th gear but the traffic started getting heavier and roundabouts are a killer when you don't want to change gear. Also, gaffer tape doesn't like heat and the heat from the engine was melting the glue. Suffice to say, I had to stop 3 more times to re-do my bodge job (I ended up using half the roll of tape), although my last version was much better and felt like it would last longer:


Luckily, most of the last 40 miles were on the motorway, so I could stay in 5th and I got to Rich at 7pm. And, in a way, it was the luckiest part of my day...

Day 4 - Tamworth to Surrey

Anyone reading this from the RHOCAR club may know Rich - he is a legend. Thirty years at JLR means he knows his stuff, has a garage (the neatest I have ever seen) filled with 'stuff' and what he doesn't know about engineering 'aint worth knowing. His garage contains his immaculate, V8-powered Zero, a mini-caravan he built himself from an old trailer and an awesome hard-top for the Zero, complete with interior light and roof vents. He's the guy who made the doors on Zedster. For him, welding up my gear shift literally took him 30 minutes - I've never seen anything like it. It took me 10 minutes to get my dash off and another 10 minutes to get the quickshift unscrewed. Rich looked at it for about 30 seconds and then started drilling, grinding, welding and painting:


I was actually very useful - I moved Rich's coffee mug so it was always close to him as he scurried round. Essential, I think...not that Rich stopped for long enough to drink it. If it had been left to me, Zedster would have been off the road for months.

Moral of the story: if you have to break down, make sure you're near Tamworth.

With Zedster back together by 11am, I considered trying to re-join the others but I would just end up driving to get to the overnight stop, missing all the days route and great roads. So I set a vague route for home, skipping all the major towns and main roads.

I actually had a great drive back - there are some surprisingly nice roads just a few miles from the edge of Birmingham and the Cotswold villages are very scenic. Strangely, Zedster's hot-starting was much improved over the day and the extra weight in the quickshift means the gear lever vibrates less - result!

Overrall, it had been a fun trip, even though I only did half of it. The weather was ridiculous (I look like I've spent a week on a sunbed), the company was great and even breaking down was a useful learning experience.

Sorry this post was so long - for more detail from others on the trip, check out this SKCC post.


Tuesday, 28 January 2020

The Rebuild continues

I'm slowly rebuilding my entire car - every time I do one thing, I end up having to change/fix 2 others.

This time, it was the wipers - one of the springs on the wiper arm broke, so it wasn't pressing on the screen and thus not actually wiping. Nice easy fix, you say? Holy Cow....

So I order a new arm (actually 2, in case the other goes soon) - arrives in less than 24 hours from CBS (impressive). I trot off innocently to the garage, remove the old arm and...er...bugger, the rubber piece has broken:


Back to the laptop and I decide to order metal replacements rather than rubber - these take 2 days to come (I did order on a Sunday, so I can't blame them).

Once more, I wander off to the garage and I'll just plop these metal bits on...er....no, they are a slightly different shape to the rubber versions, so they need filing down. The first one takes a mere hour to get right - it's a small, awkward round shape, difficult to hold in a vice while I file it down.

The second one? Holy Mother of the Great One - I do not understand why this one was so tough but my file didn't even scratch it. They are chromed but I didn't think a chrome finish was that tough? I eventually had to get the Dremel out, hack off a piece, then use a sanding disc and finally I got some purchase with the file.

Unbelievable! A job that I thought would take 10 minutes took me about 3 hours!!


I didn't have the time to actually try them out, so I hope I haven't re-aligned them wrong - we shall see.

Sunday, 29 December 2019

Show me the speed!

So, my original Smiths speedo hasn't been working properly for a while (OK up to 40mph, then won't go back to zero and so you end up showing as doing 140mph, with the odometer going up in unison). So time for a new speedo...

I decided I wanted a GPS controlled speedo which means 2 options; a £50 Chinese item or a £250 unit from someone more trustworthy (there is honestly nothing in between) . Normally, I'd go the cheap route but the cheap ones don't have a trip meter and I use that all the time because I can't trust my fuel gauge. So the expensive option it had to be... Speedhut in the US do an infinitely customisable unit, so that's what I went for.

It arrived a few weeks ago and wasn't quite right; the blue of the dial was much darker than their website showed, making the silver numbers not very legible. But I couldn't be bothered to wait weeks sending it back, so it will do:


It does feel very good quality, solid and well made. Fitting it was fairly simple; first, remove the old dial and widen the hole slightly:


The wiring should have been simple (but see later) - 12v ignition, earth, dial illumination and a permanent live feed for the unit to store GPS data so it gets a quick signal the next time you start up. The permanent live was a simple wire direct to the positive terminal of the battery and I decided to reuse the plug from the old Smiths dial - I had the original wiring diagram it came with, so it should have been simple - snip the 3 wires out of the plug I needed (for some reason, it has about 7 wires, most of which aren't used), fit terminals and job done.

I've recently rewired my dash to make it easily removable with plugs for all the wires - the problem here was the GPS receiver has to go on top of the scuttle and I couldn't easily make a plug for the special coax cable it uses to connect to the dial. So I had to fit the unit so that it comes away with the dash, rather than being permanently attached to the scuttle. This required a little bit of jiggery-pokery - first a slot in the ally that the dash bolts to:


Then a piece of steel 3Md to the scuttle (because the magnetic GPS receiver can't stick to the ally scuttle) :


And now the GPS receiver attaches to that and its cable slots behind the dash - visible but not too horrendous and means the whole dash can come away:


Sadly, on a test drive, the darn thing didn't work, I think because I used the wires from the old Smiths wiring plug for the power and I guess the generic wiring diagram is incorrect (green wire for the +12v did seem a bit weird now I think about it). So I need to redo the wiring using my known 12v ignition terminals. I'm pretty sure the dial itself is fine because the illumination does work, so it's just the main power.

Hopefully have it working next time and I can play with the built-in 0-60 timer 😉

Sunday, 1 December 2019

Wiring archaeology

So everything was going swimmingly UNTIL Zedster wouldn't start. Ever since Emerald kindly updated my map to improve the cold starting, Zedster has started almost first time. But then, with no warning, the starter motor began acting like it was on it's last legs, turning at half-speed as if the battery was almost flat (it wasn't).

Now, I have has issues with my ignition wiring before and I have tried to improve it. When trying to crank it, I could feel the wires warming up, suggesting a short circuit or loose connection.

Also, my screen washers and LED strip had stopped working, so time to dig into some wires. I took off the dash and a wire dropped out - so that explained the washer motor not working. I've recently added 2 new wires in here; one from the oil pressure sensor and the other a live feed to my DRLs. These wires were simply run from point A to point B so I couldn't actually take the dash all the way off. So, time to sort that out - cut the wires and made up a plug so that, in future, I could just unplug the wires.

I've decided the best way to do plugs is to use these things:


Unlike the other crimp type, these get a much better grip on the wires; the rear arms grip the plastic and then the smaller arms at the front grip the bare copper - much firmer than the single metal tube that you have to try crush to grip both plastic and copper at the same time.

I should really have re-done all the plugs I could this way but, to be honest, there are so many it would take me ages. For now, I just re-did the wire for the washer motor that had dropped off, as well as all the new plugs I mentioned earlier.

My LED strip has died (the wiring is, amazingly, fine) but fortunately, it came as a pack of two (for about £3) and the other one works, so swapped them over.

On the main ignition wires, I think my problem was I had tried to fit 4 (!) neutral wires into one crimped plug! What was I thinking...?! As soon as I pulled the insulation tape off, these wires dropped out the plug!

I couldn't find any ready-made plug-like thing that could make 4 wires into one, so I did it the manual way; 2 wires into a butt connector, repeat for the other 2 and then merge those 2 wires into another butt connector and finally we have one wire into the ignition plug, instead of 4 - like this:


(I could take a photo but you can't really tell what's happening with that).

I don't know if this is an an acceptable method but, once all connected up, Zedster started up immediately, so it seems to be working (for now).

I've left the dash unbolted as I'm hoping to get my new speedo this week, so it will all have to come out again to install that.

Sunday, 17 November 2019

Brace yourself

Sorry my loyal fans (all 3 of you :-) ) - been very lazy since my last post. The weather has been atrocious and feels like it hasn't stopped raining, so I haven't missed any good driving time.

I did briefly pop out in Zedster a couple of weeks ago but my misfire was still there, although not un-driveable. At the suggestion of a forum member, I thought I'd check the inlet manifold. If there was any sort of air leak through that, that might account for my misfire.

I started Zedster up and sprayed brake fluid around the inlet manifold, the idea being that if there was an air leak, the fluid would find it, go into the cylinders, ignite and briefly raise engine revs. However, nothing happened, so I'm hoping that isn't the problem.

I went out for a drive and no misfire UNTIL I hit some bumpy back lanes and this backed up the suggestion from another forum member who said it might be my coil pack plug vibrating and occasionally losing the spark to a cylinder, hence a misfire.

I had previously tried to secure the plug but it was a relatively loose attempt, so I decided to try make something more solid. I found a spare threaded hole on the bracket that the coil pack screws into, so I used my superior (!) metalwork skills to make a bracket to cable-tie the plug too:


I went out for a drive and...NO MISFIRE! Now, I'm not going to get excited because this damn thing has made a comeback before but I'm hoping I've at least improved the situation - we shall see.

In other news, I've ordered a new speedo, a funky GPS type from Speedhut in the US. A tad expensive at £250 but even a replacement for the one I've got is about £140 and that didn't last long, so I thought I'd go for it. The advantage of this one is that I customised it to death and its GPS controlled, so it will be accurate. It also has a few nice functions (0-60 timer, compass etc), although it's not going too match my other dials but I don't mind - I think a different-look speedo could look actually quite good.

In an attempt to save any annoying import duty, it's being delivered to my brother who lives in Florida and he will post it on to me, so it may take a while to get here but no rush.

Wednesday, 28 August 2019

Keeping it clean

So, finally got round to changing the fuel lines. When I took the old ones off (just the HP circuit, the LP circuit looks ok), this is what the lines looked like after 2.5 years and just 7k miles:


When I cut it open, those splits go half way through the pipe:


Now, these are supposed to be R9 standard pipes, the best you can get. However, there are lots of stories online of fake stuff and, in fact, I couldn't find a single place that didn't have a negative story online and there seems to be no way to be sure you're getting the real stuff. So I opted to just get the best quality that I could get from CBS. This is DIN rated, which no-one seems to bother faking and I can always complain to CBS if it falls apart.

I also drained the swirl pot and saw a few tiny rubber particles in the jar. It didn't look horrendous but injector jets are tiny so even small bits could be causing my misfire. Because of these, I've also now added a fuel filter in the HP circuit:


It's clear so I can keep an eye on any dregs.

So, replaced all this, went for a short drive and...misfire gone. But I'm not getting too excited yet until I've done some more miles.

I've got a long weekend to Wales in mid-September with the SKCC - really looking forward to that.